

Japan is among the many most visited international locations for Filipino vacationers, and it isn’t obscure why. There’s a lot to like about Japan that its proximity to the Philippines is only a bonus. Even our crew has visited The Land of the Rising Solar over a dozen occasions.


The nation has a superb combination of historic custom and modernity that makes for a memorable journey expertise. With a complete of 47 prefectures, it’s filled with numerous gorgeous landscapes, a wonderful culinary scene, a wealthy historical past, and hospitality like no different. One factor is for certain: you’ll finish your journey wanting for extra.

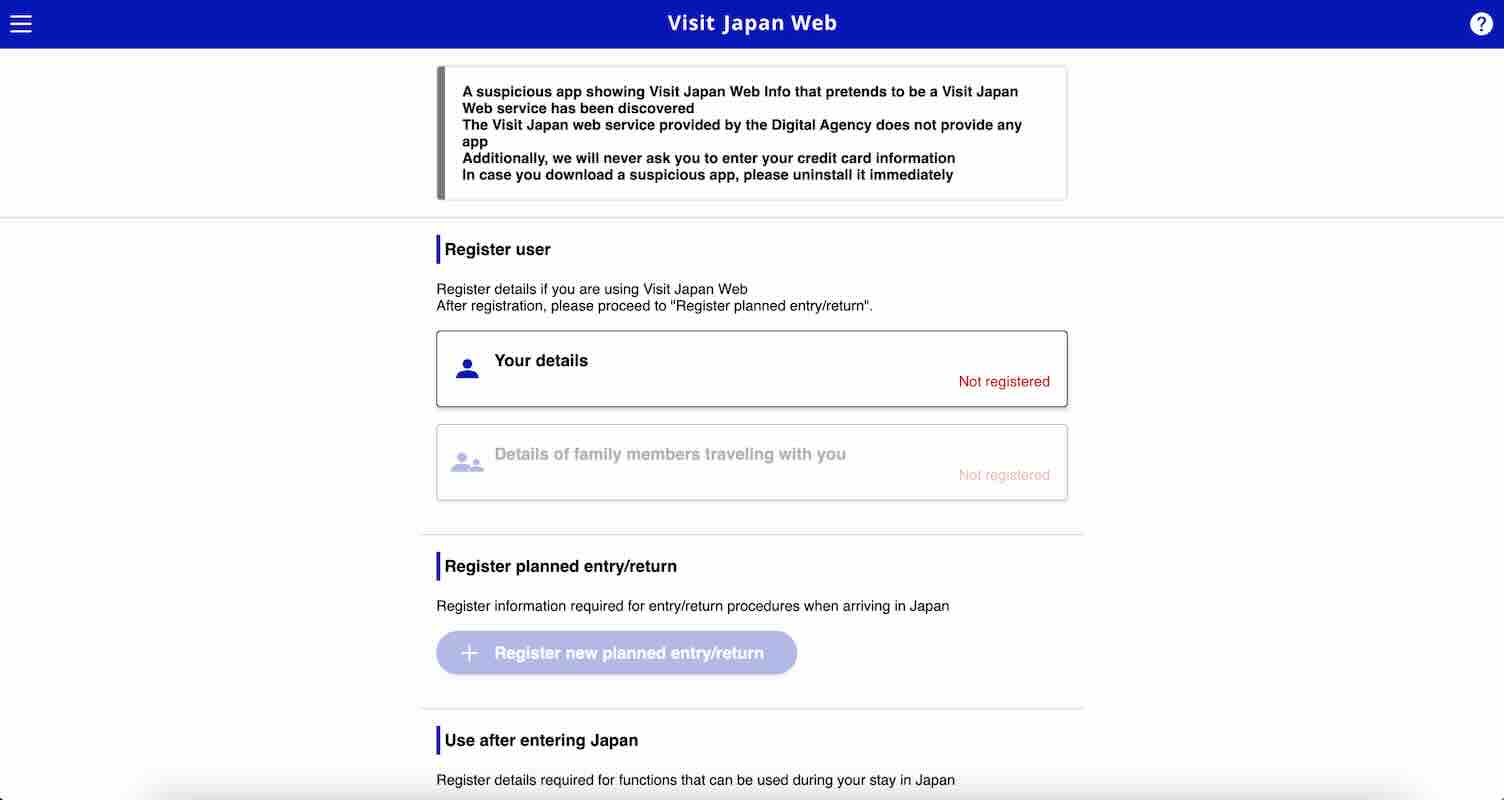
One other factor vacationers love about Japan is the comfort it gives. One, its prepare system connects each main metropolis, making many sights simply accessible. Two, it’s by no means wanting lodging and meals choices. One other factor that Japan made extra handy in current occasions is their immigration procedures. They now have Go to Japan Internet for a smoother arrival clearance on the immigration space.
On this article, we’ll information you on how one can accomplish your Go to Japan Internet and the way you should use it on your journey to Japan.
What’s Go to Japan Internet?
Go to Japan Internet is an internet site that permits vacationers going to Japan to pre-register the mandatory info for immigration procedures. When you register, you’re going to get a QR code that you should use for immigration clearance and customs declaration. With this, you may undergo the arrival course of faster, saving you lots of time. Vacationers may also use this service to create a tax-free QR code that they will use when making tax-free purchases at eligible shops.
Learn how to Register for Go to Japan Internet
1. Create an account.
Go to Go to Japan Site. You are able to do this in your cellular system or your laptop. Click on “Join” for a brand new account on the backside of the web page.
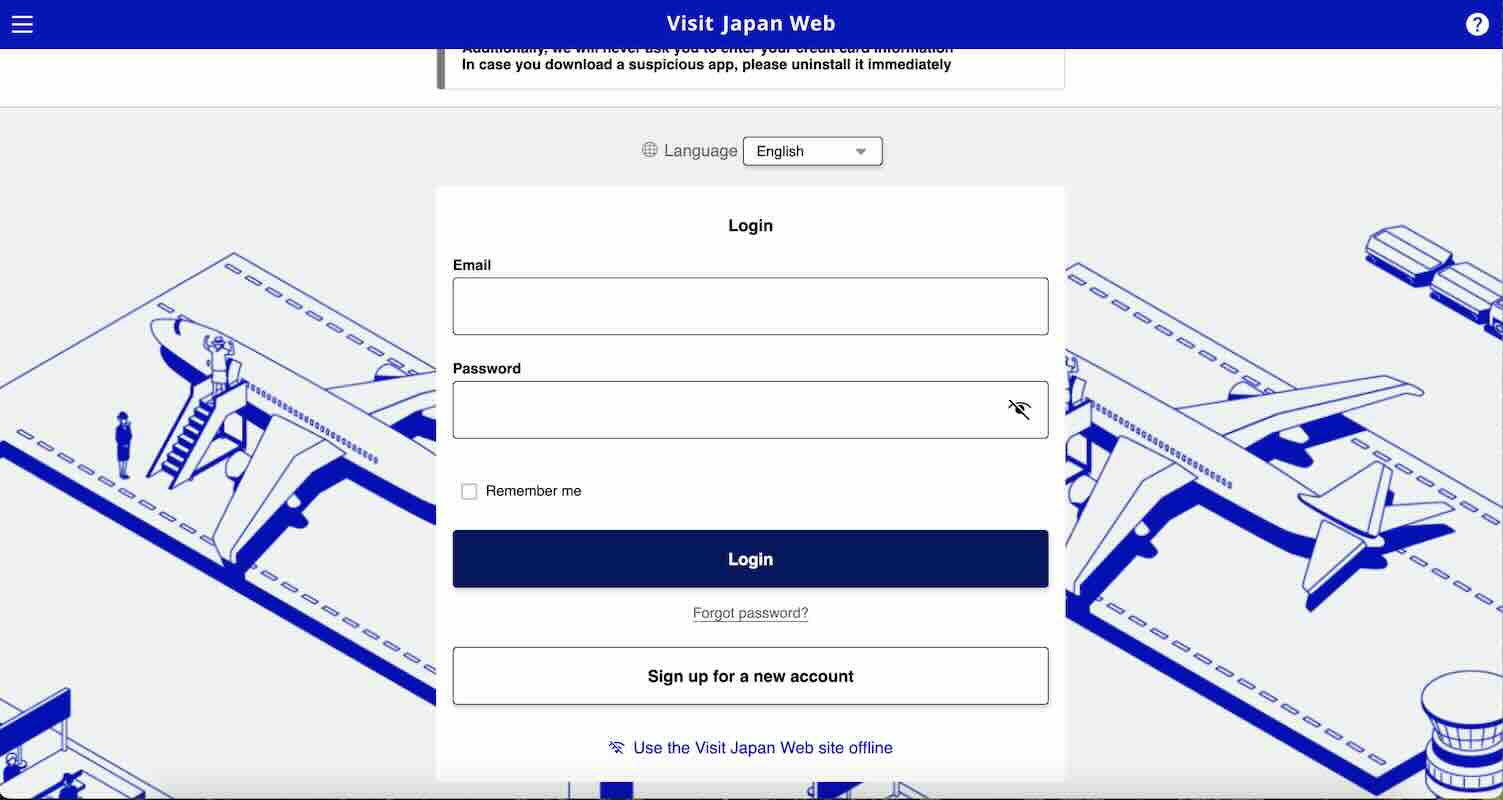
Then, learn the Phrases of Use and Privateness Coverage. Tick the bins to agree and click on “Subsequent” to proceed.
2. Enter account particulars.
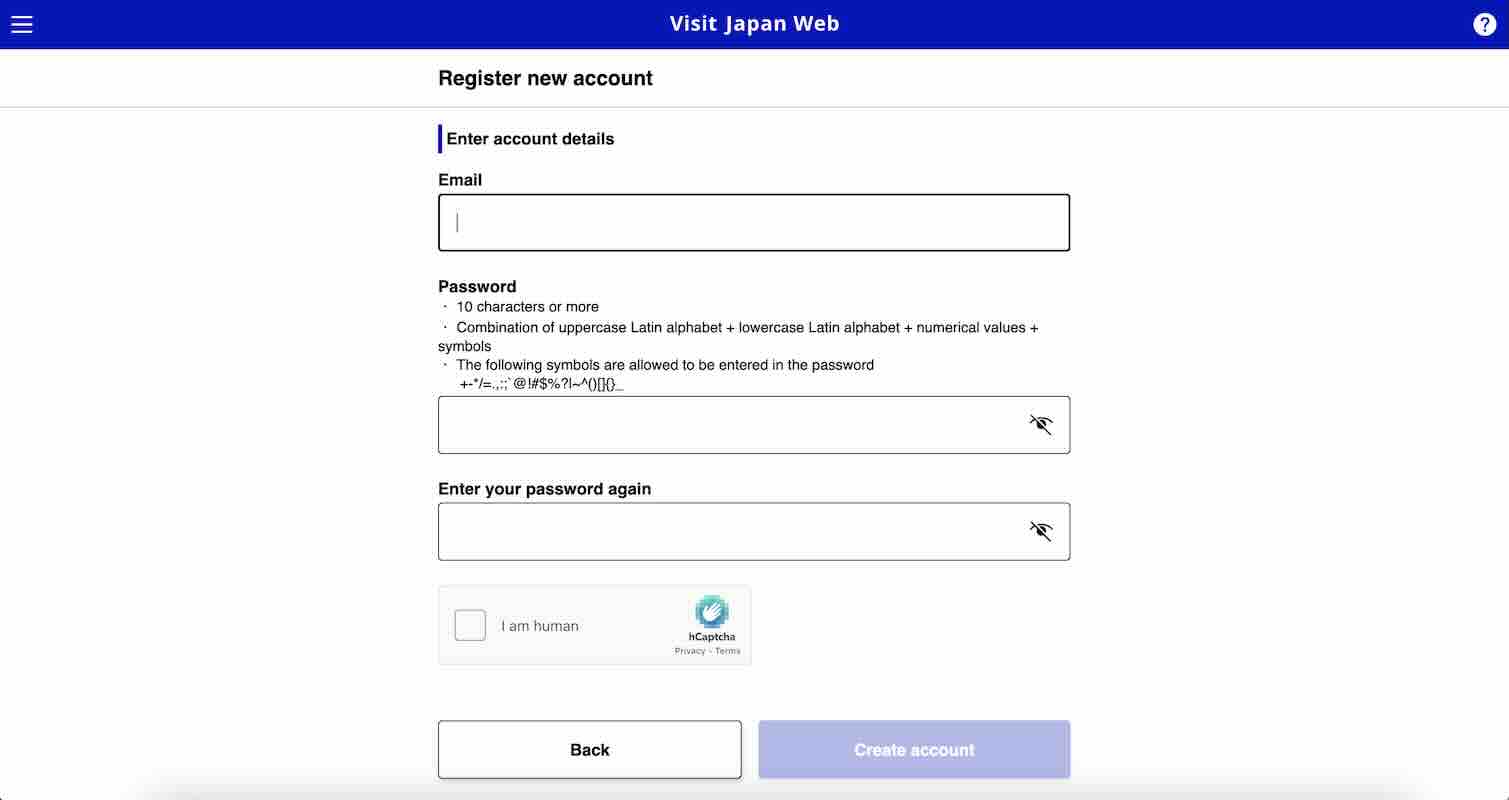
Sort in your electronic mail handle. Guarantee that it’s a working electronic mail handle that you may entry since a affirmation can be despatched right here. Then, create a password and ensure it meets the next standards:
- Has 10 characters or extra
- Has each uppercase and lowercase letters
- Has numerical values
- Has a number of of those symbols: +-*/=.,:;`@!#$%?|~^()[]{}_
Re-enter your password and full the captcha. Then, click on “Create account”.
3. Verify electronic mail.
A affirmation code can be despatched to the e-mail handle you used to register. Examine your electronic mail and enter the code. Then, click on “Verify electronic mail”.
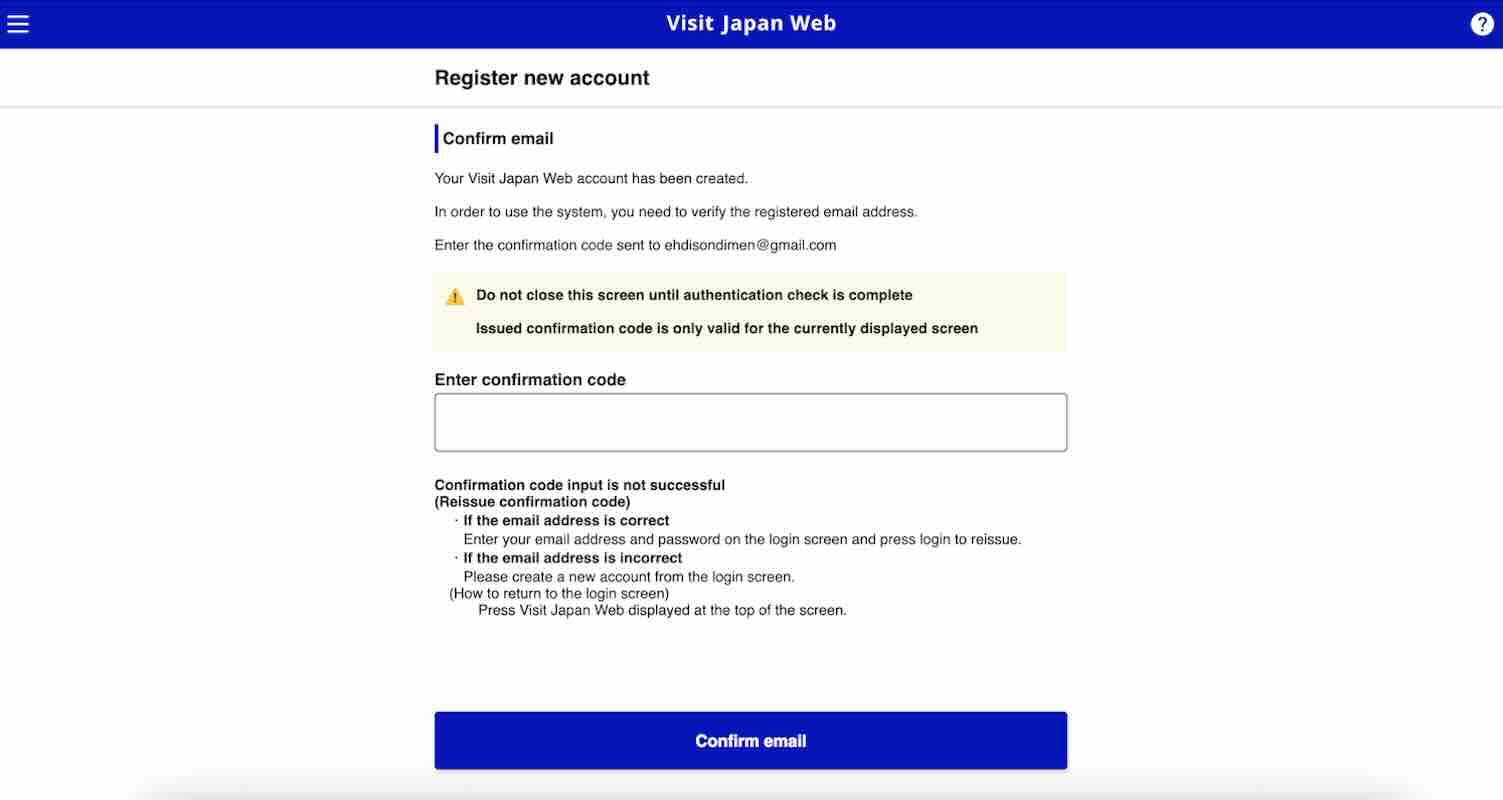
If the affirmation is profitable, a pop-up window will seem with that message. Click on “Go To Login Display”.
4. Login to your account.
Enter the e-mail and password you registered and click on “Login”.
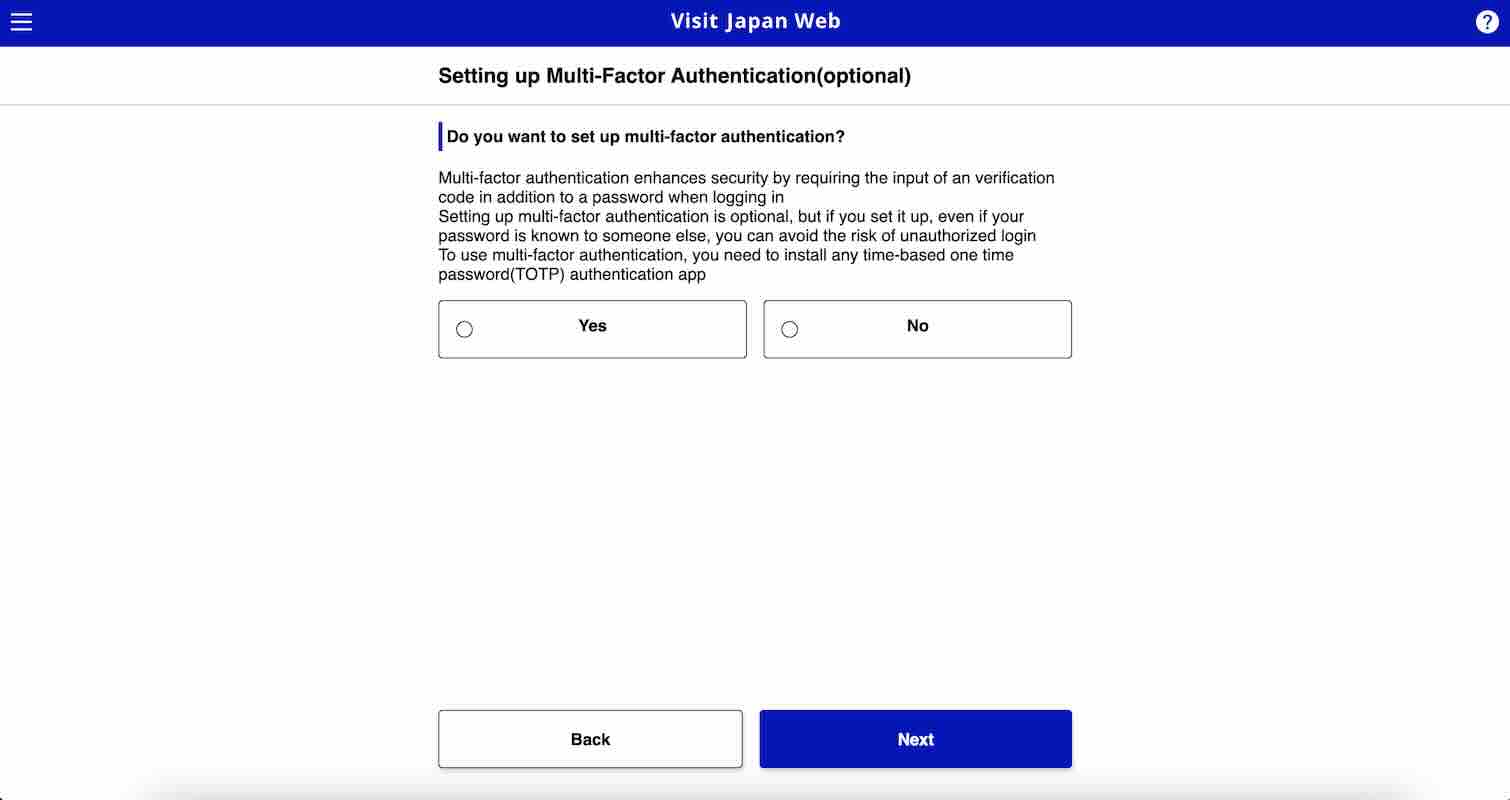
After this, you may choose to arrange multi-factor authentication. This will provide you with further safety to your account. However observe that selecting to arrange multi-factor authentication would require you to put in an authentication app like Google Authenticator or Microsoft Authenticator.
Should you don’t wish to use multi-factor authentication, click on “No”. Then, click on “Subsequent”.
5. Select your entry/return process class.
Click on “Your particulars” to start out getting into your private info.
On the primary web page for this part, you’ll reply the next questions for the entry/return process class:
- Do you will have a passport issued by the Japanese authorities?
- Do you reside in Japan and can re-enter Japan with a (particular) re-entry permission?
Should you’re a vacationer, your reply to each these questions will probably be “No”. Then, proceed to answering whether or not you’ll use a tax-free QR code or not. After that, click on “Subsequent”.
6. Register passport particulars.
Ensure to have your passport with you if you do that step. You could have two choices to register your passport particulars: scan with digital camera and manually getting into the data. Select which methodology you like, then click on “Subsequent”.
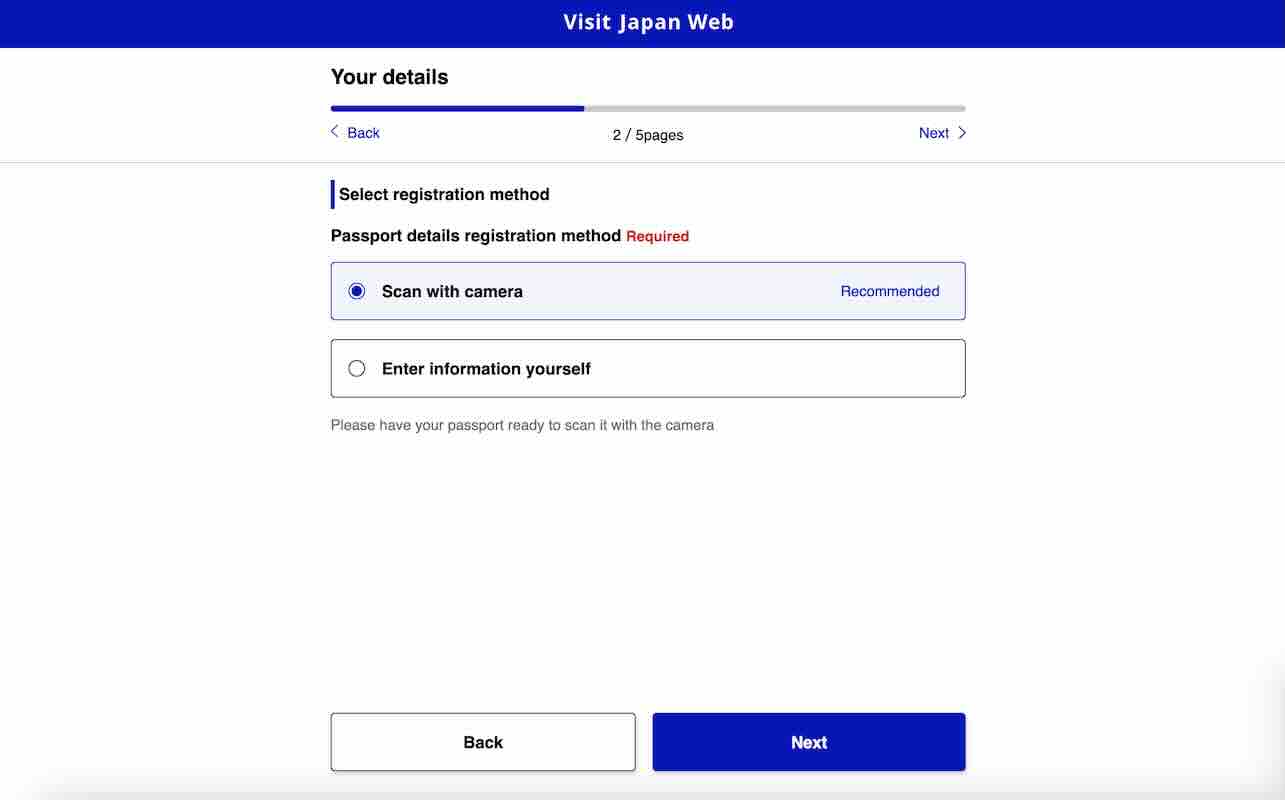
Should you’re getting into the data manually, listed below are the main points you would want to offer:
- Passport Quantity
- Surname
- Given Identify
- Nationality
- Date of Delivery
- Date of Passport Expiry
When you’ve efficiently entered all the main points, click on “Subsequent”.
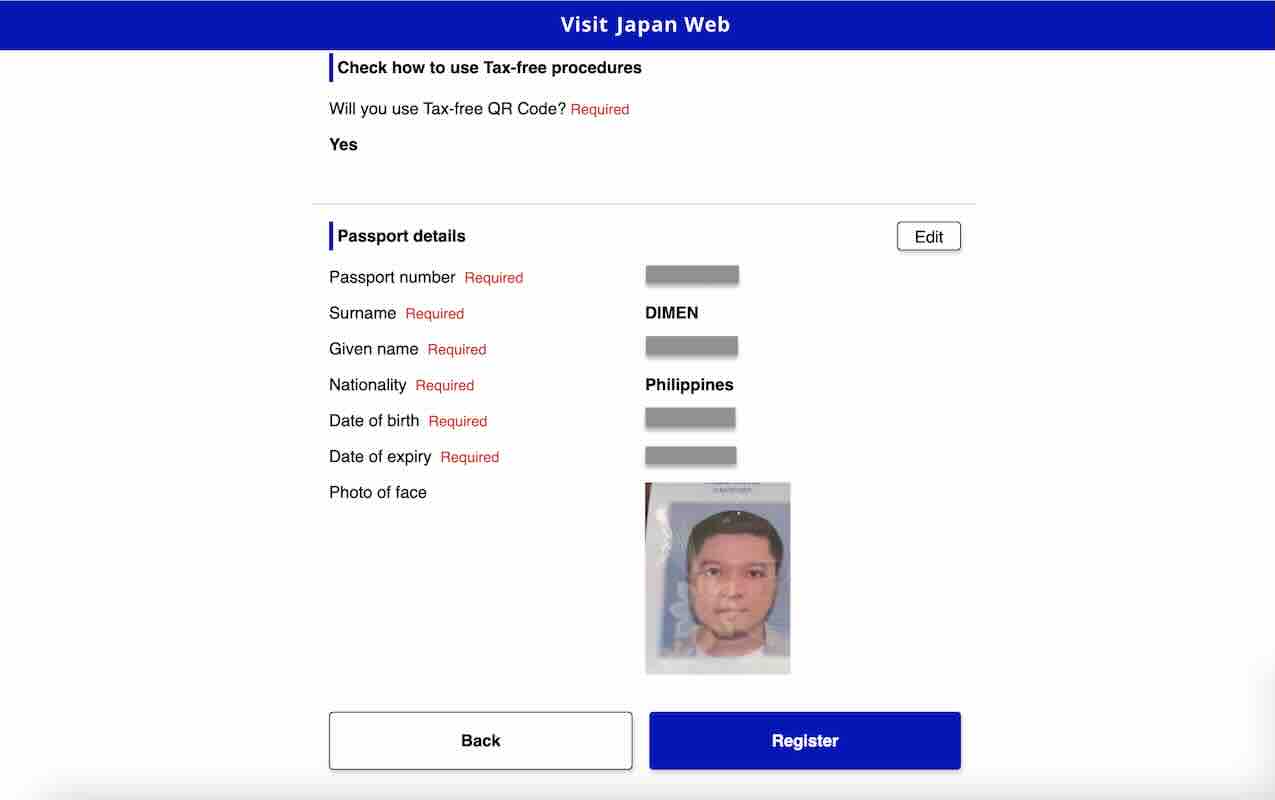
7. Verify the main points you entered.
On this web page, you’ll see a abstract of all the main points you supplied. If there’s any mistake, simply click on the “Edit” button on the best aspect of the part you want to edit. If every little thing is right, click on “Register”.
8. Examine visa particulars.
Upon profitable registration, you will notice a pop-up window telling you so with a immediate to examine whether or not you want to apply for a visa. Click on “Examine VISA requirement”.
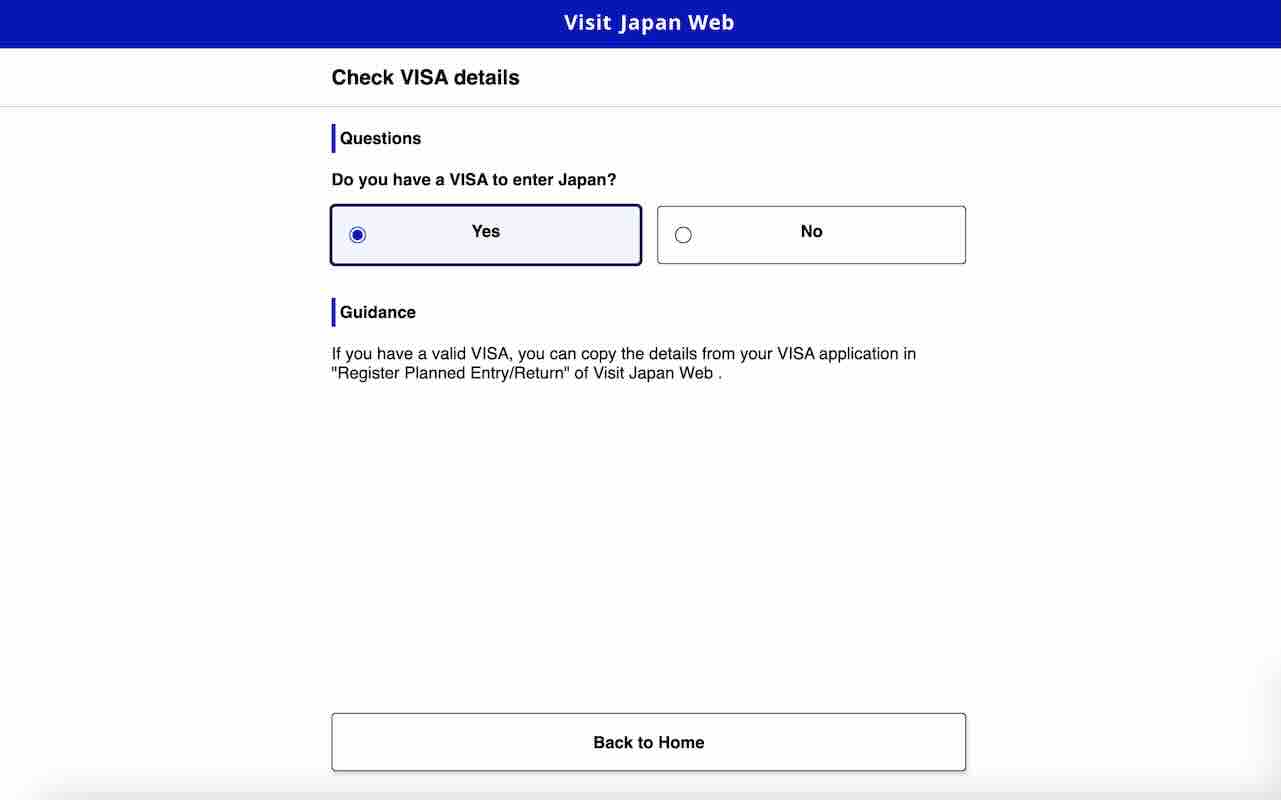
Then, click on “Sure” to verify in case you have a VISA to enter Japan. After that, click on “Again to Residence”.
9. Register Deliberate Entry/Return.
On the homepage, click on “Register new deliberate entry/return”. You possibly can select to repeat the main points of your journey out of your visa utility or enter the main points manually.
Should you select to repeat the main points out of your visa utility, you’ll must enter your visa concern quantity.
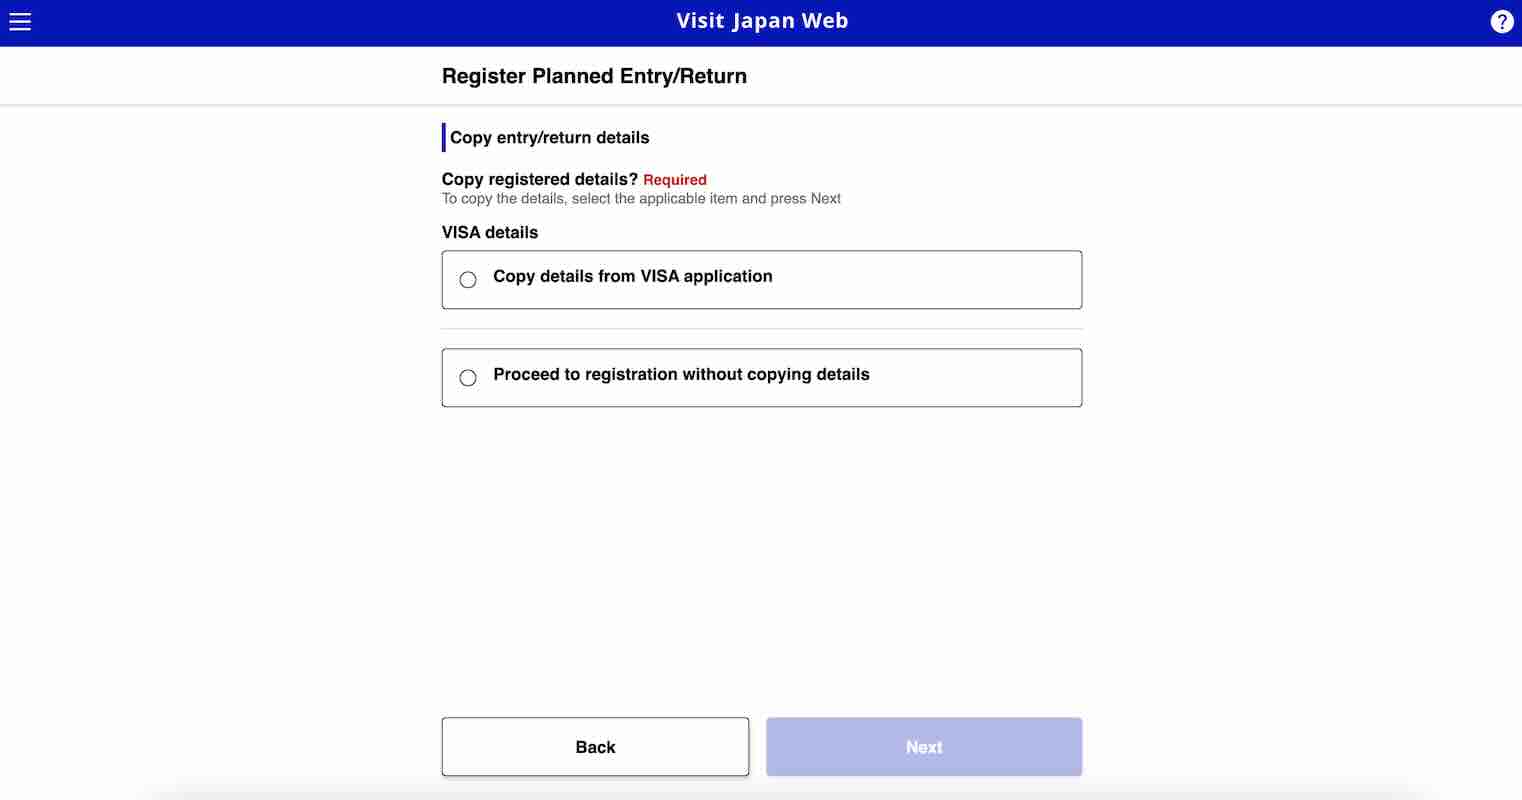
In the meantime, if you happen to choose to enter your particulars manually, listed below are the fields you want to accomplish:
- Journey Identify
- Deliberate Arrival Date in Japan
- Airline Identify
- Flight Quantity
After finishing all these particulars, click on “Subsequent”.
On the subsequent part, you want to enter the handle of your lodging in Japan. Listed below are the main points you’ll want to offer:
- Prefecture
- Metropolis
- Deal with
- Lodge Identify
- Contact quantity
When you’re executed getting into all the mandatory particulars, click on “Verify entered particulars”.
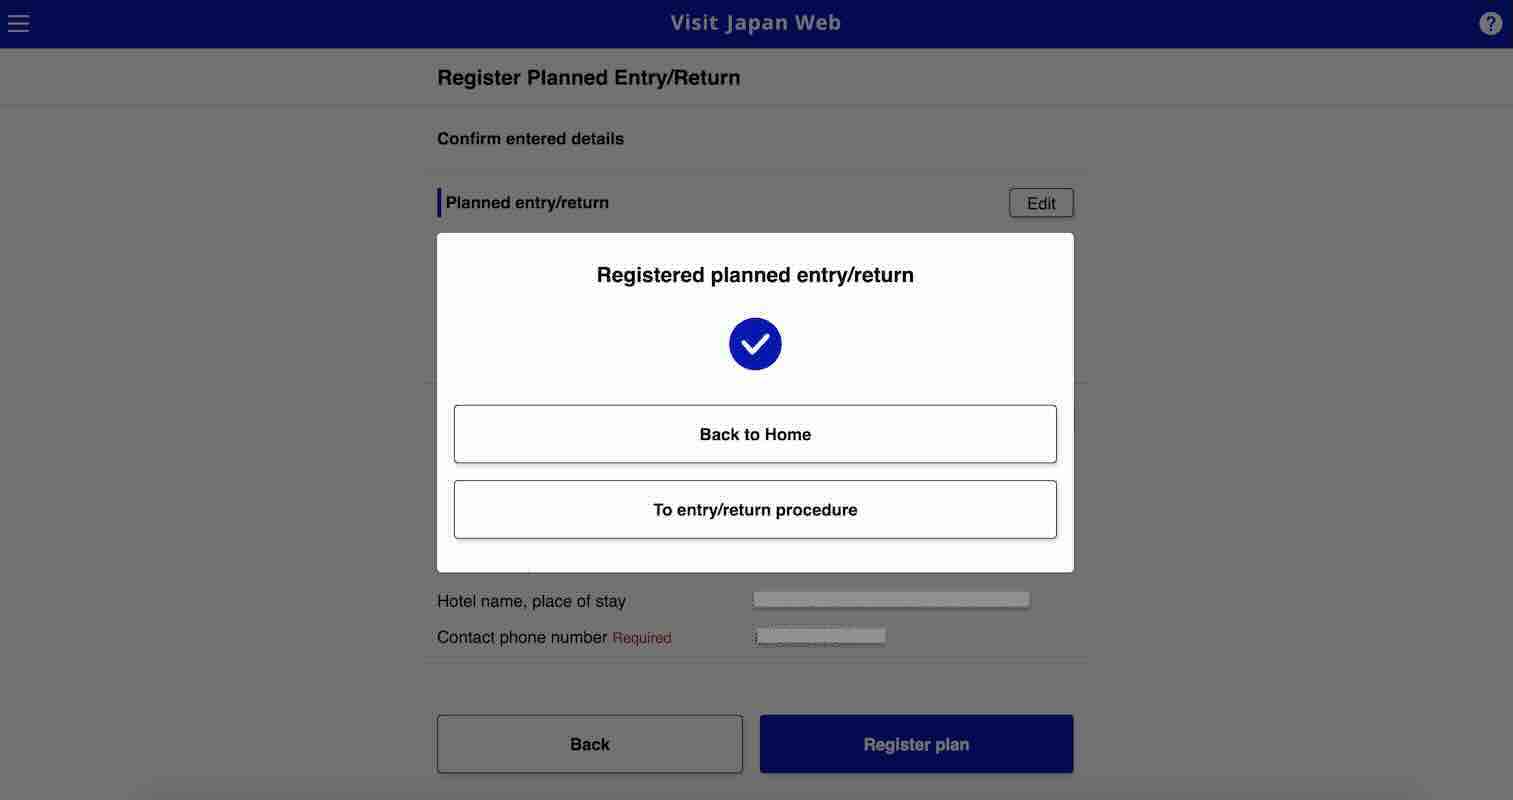
Then, on the pop-up web page, click on “To entry/return process” to proceed to the subsequent step.
10. Generate QR code for immigration clearance.
On this web page, you’ll see that you may additionally hyperlink your visa right here, however that’s optionally available. We’ll skip that course of right here and proceed to the preparation for immigration clearance.
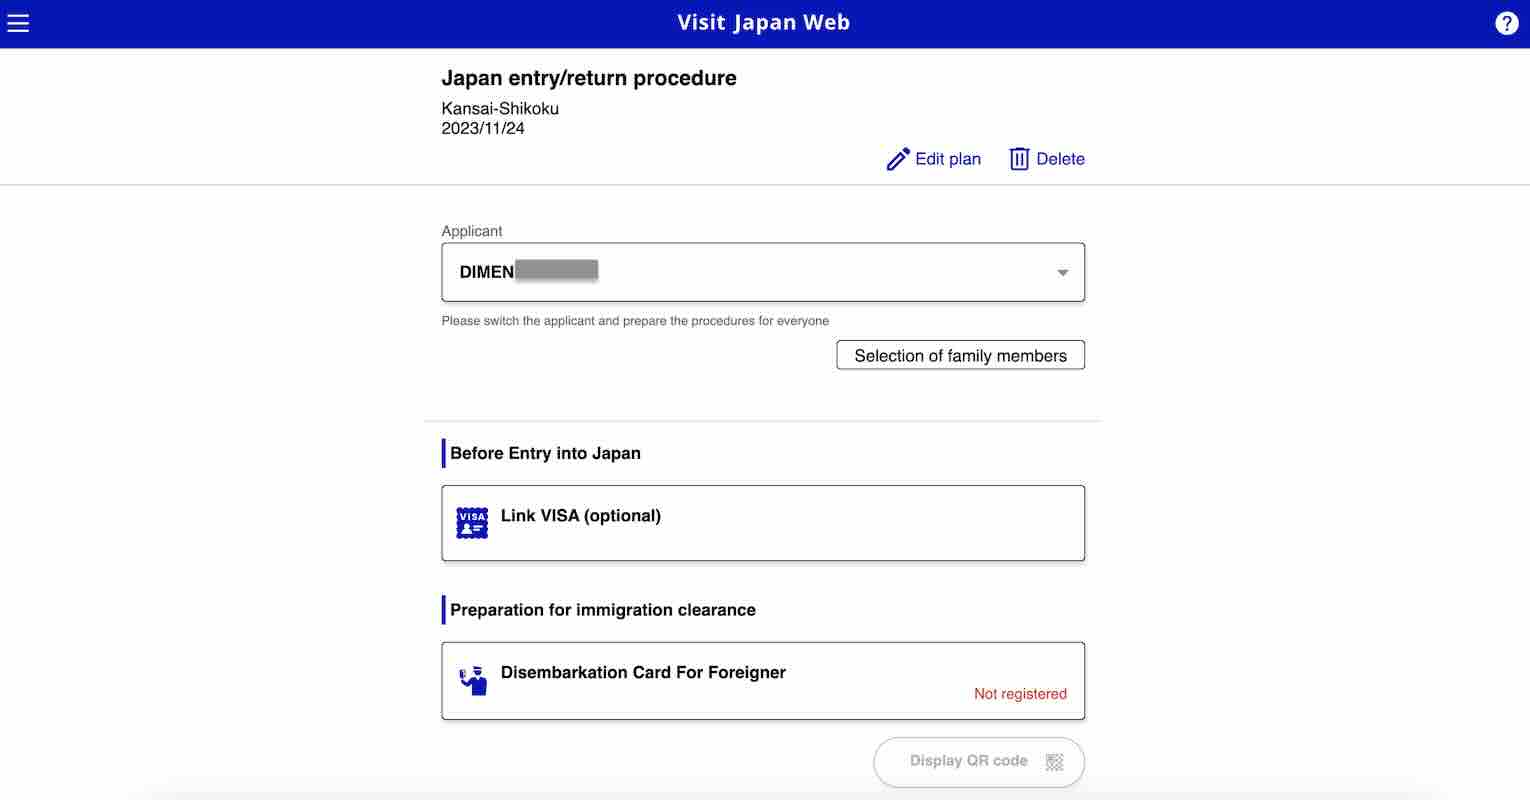
Click on “Disembarkation Card for Foreigner”. That is the shape you’d usually fill out manually earlier than touchdown. On the pop-up window, click on “Subsequent” to start out your registration course of.
Listed below are the main points you want to fill out:
- Residence Deal with
- Objective of Go to
- Final Flight Quantity
- Period of Keep
- Prefecture
- Metropolis
- Deal with
- Lodge Identify
- Contact Quantity
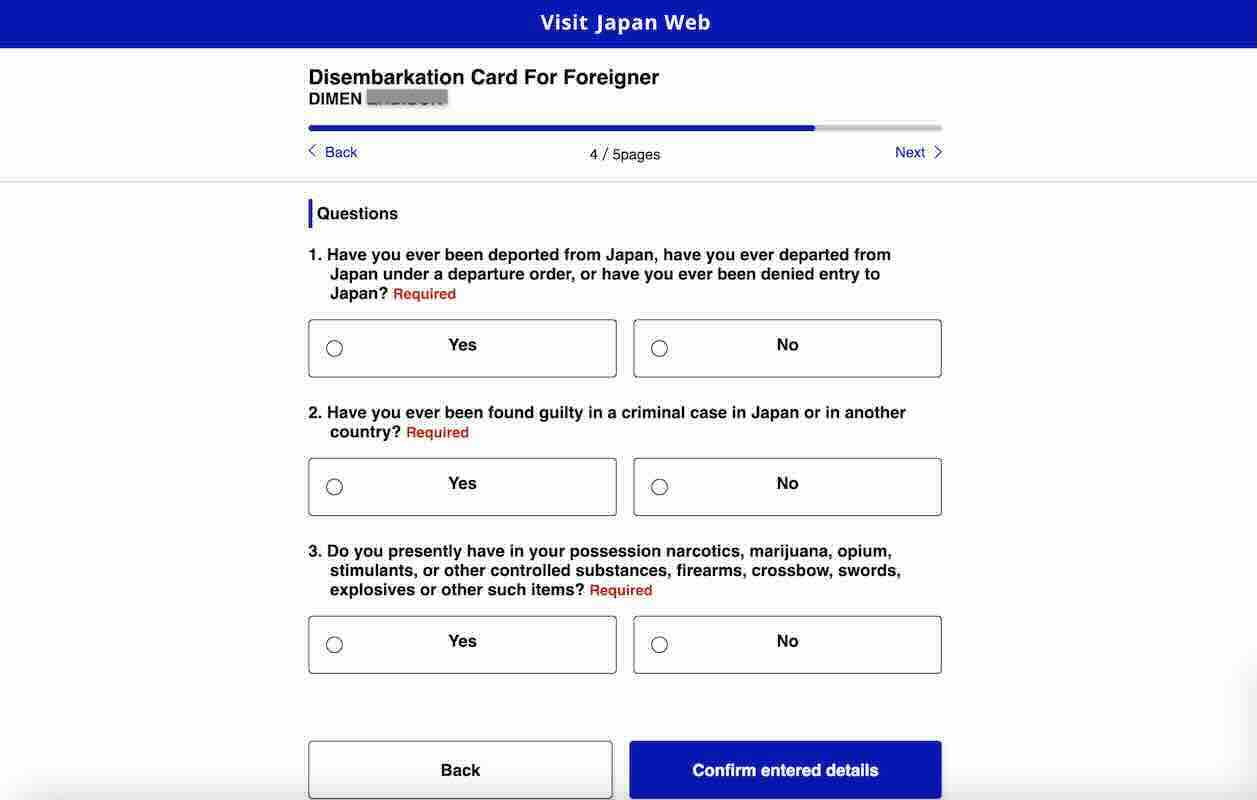
After getting into all these info, click on “Subsequent”. You then’ll must reply just a few questions. As soon as every little thing is ready, click on “Verify entered particulars”.
On the subsequent web page, you’ll be proven a abstract of all the main points you entered. If every little thing is right, click on “Register”. Then click on “Again to Entry/Return” to proceed to the subsequent step.
11. Generate QR code for customs declaration.
On a pop-up window, you may examine how the digital customs declaration works. When you’ve learn the main points, click on “Subsequent” to start out filling out the shape.
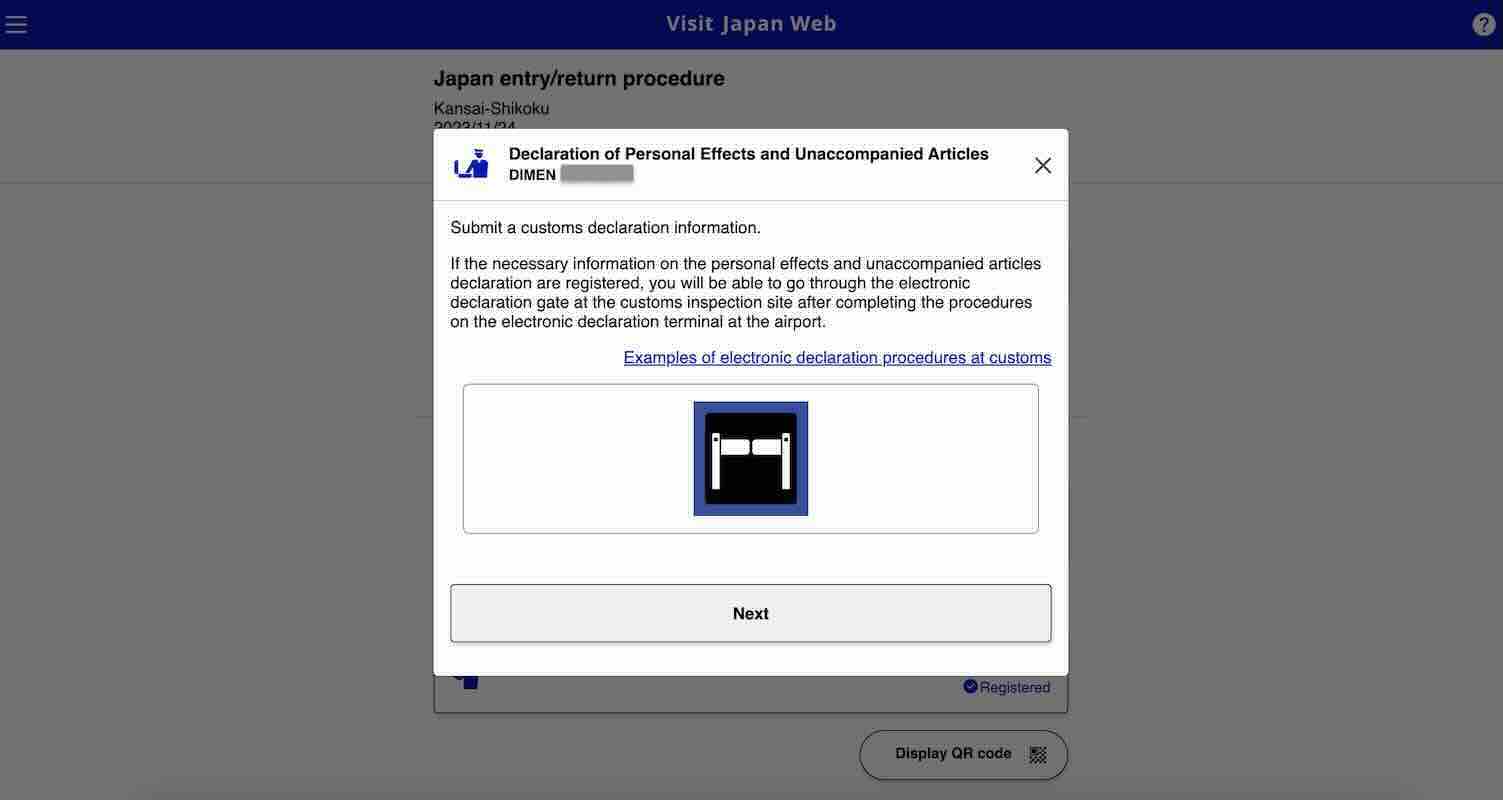
Beneath are the main points you want to submit:
- Occupation
- Date of Arrival in Japan
- Flight No./Identify of Vessel
- Level of Embarkation
After typing in all of the required particulars, click on “Subsequent”.
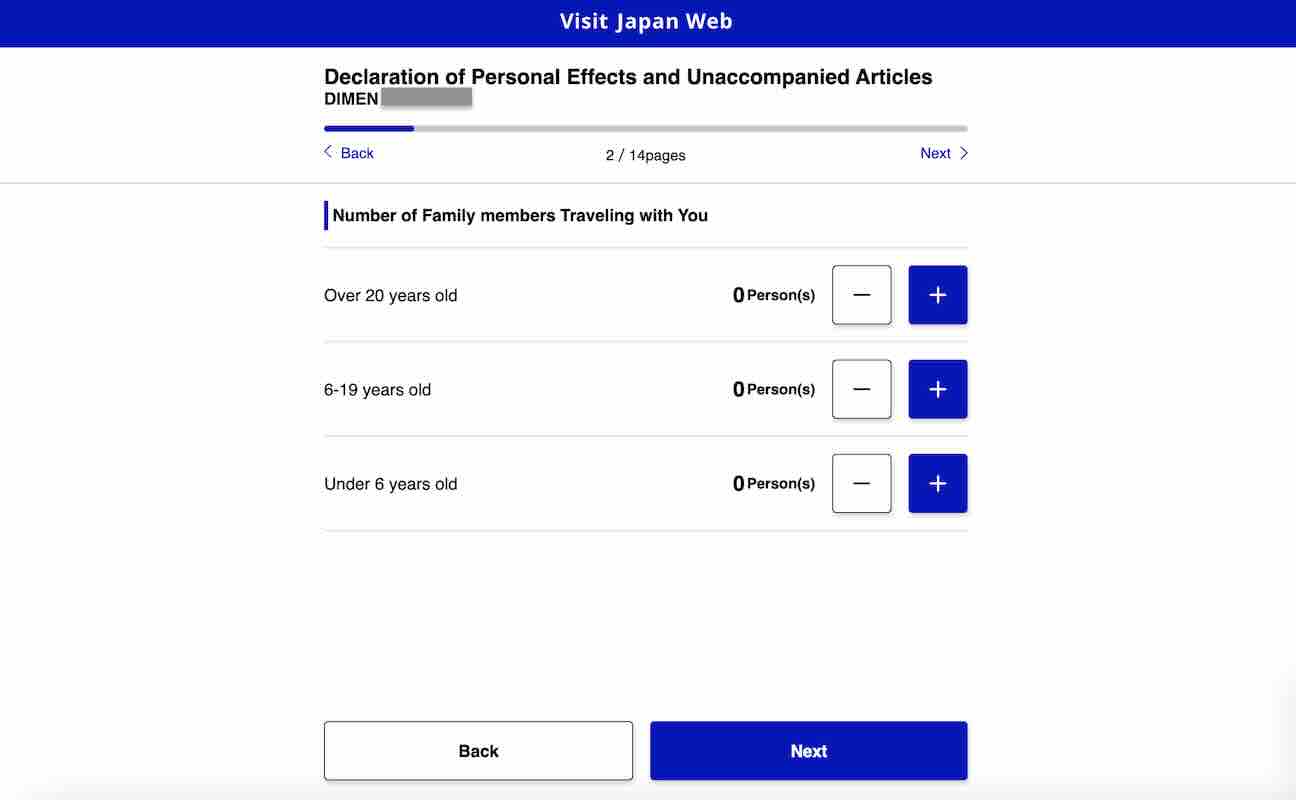
On the subsequent web page, you want to enter the variety of relations touring with you. Should you’re not touring with any household, simply go away them at zero (0) and click on “Subsequent”.
11.1 Declaration Data
On this part, you’ll reply questions on objects you’re bringing into Japan. Among the many prohibited objects are firearms and explosives. There are additionally restricted objects together with meat merchandise, fruits, greens, and crops. Learn each merchandise to be told concerning the restrictions and different info you want to know for customs declaration.
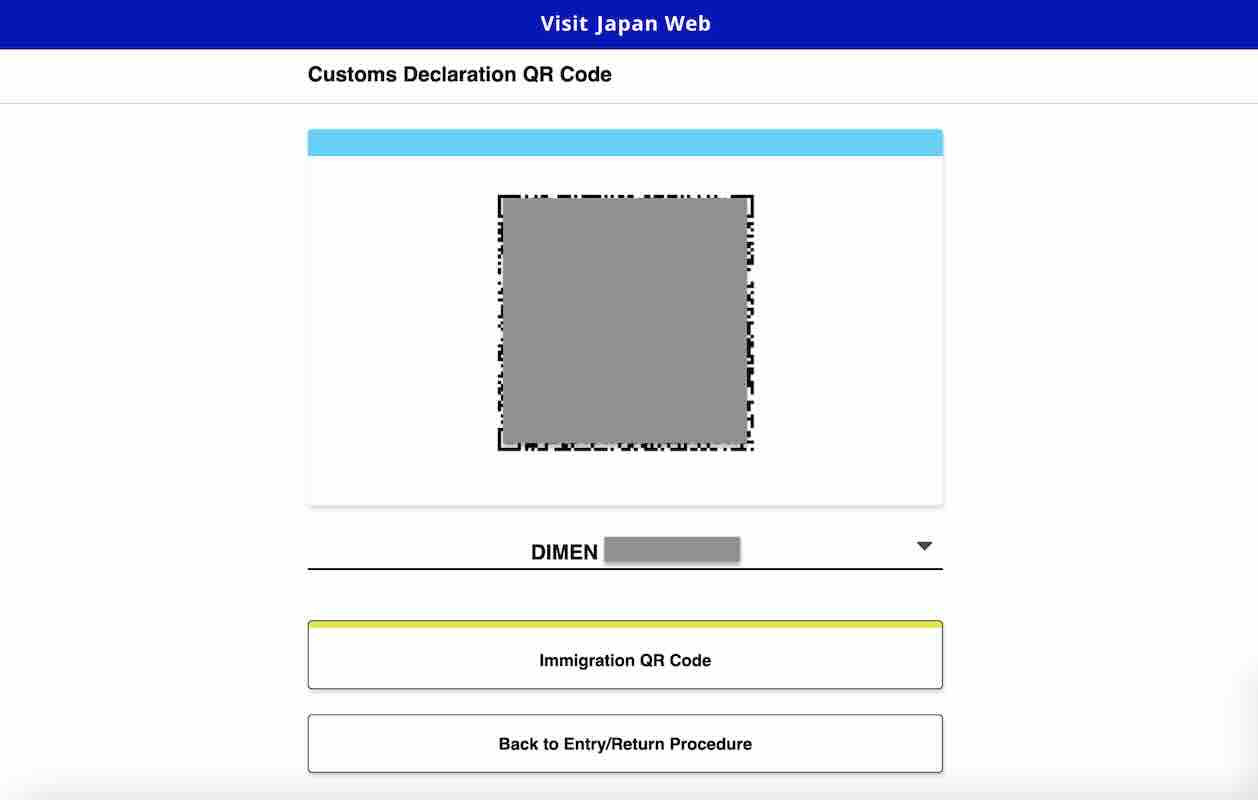
When you’re executed, click on “Subsequent” to generate your QR code for customs declarations.
Have Peace of Thoughts Whereas Touring!
Getting a journey insurance coverage is optionally available, however we extremely advocate this, particularly when touring overseas. Journey will be unpredictable, and although we hope we’ll by no means use it, having it provides us peace of thoughts in case of sudden delays, cancellations, or emergencies.
For worldwide locations, contemplate PGA Sompo’s TravelJOY Plus insurance coverage. You possibly can GET IT HERE. Don’t neglect to make use of WORTHIT for a particular inexpensive charge.

Updates Log
2025 4 25 – First uploaded


